
OpenClaw is an open source AI agent, which connects to an external LLM (Large Language Model). This means that the "AI" itself is not part of OpenClaw. OpenClaw can be understood as a "gateway" between your communication tools (e.g. Slack) and the LLM.
Note: OpenClaw was previously named Clawdbot and Moltbot.
On this page we focus on how to install OpenClaw on a Linux machine, running Debian 13 (Trixie) and inform about some gotchas.
Important warning!
OpenClaw is nowhere near a production level, yet. You should consider installing and trying out OpenClaw to learn more about AI Agents and how to use LLM APIs. Being paranoid towards OpenClaw definitely helps. Do not give OpenClaw access to trusted documents, secrets or passwords. Run OpenClaw in a separate environment (e.g. in a dedicated VM).
The Setup process
The official documentation is quite extensive and describes the most important tasks. However some topics might be difficult to understand, especially for users new to the whole AI topic.
As root user or user with sudo privileges, run the following command:
root@openclaw:~# curl -fsSL https://openclaw.ai/install.sh | bashThis installs NodeJS, npm and other dependencies in the background (hence the need for sudo). The newly added openclaw command is now also available.
Note: If you don't like to run a shell script from the Internet with elevated privileges (I totally understand this!), you can also manually install the requirements: NodeJS >=22, NPM. Then install openclaw using the npm command as described here.
Once the installer script has installed all the Debian packages, it automatically starts the "onboarding process", which launches the command openclaw onboard in the background.
If you are currently the root user on this Debian machine, you should cancel the onboarding process. We don't want OpenClaw to run as root on this machine. Besides that, the onboarding process will be unable to create a working Systemd service configuration as root user.
Let's create a dedicated user and group for openclaw:
root@openclaw:~# useradd -s /bin/bash -m -d /home/openclaw openclawNow change to the newly created openclaw user:
root@openclaw:~# su - openclaw
openclaw@openclaw:~$
The onboarding process
As openclaw user, run the onboard process:
openclaw@openclaw:~$ openclaw onboard --install-daemon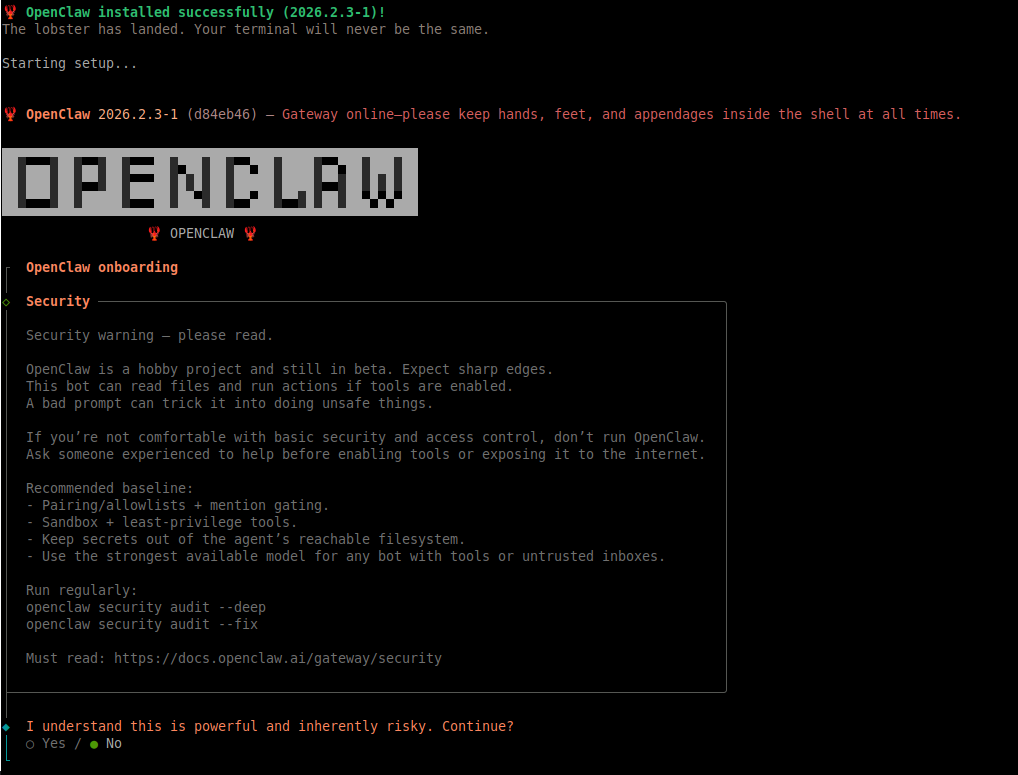
The first part (Security) is a warning, similar to the warnings we added at the top of this howto. Make sure you don't run OpenClaw in a public environment, lock it down as much as possible (sandbox). To continue, use your [left arrow key] and highlight the "Yes" option, then hit [Enter].
The next step is the onboarding mode. The QuickStart mode is recommended.
Gateway listener configuration
The QuickStart mode uses a good default configuration for the gateway listener configuration:
◇  QuickStart ─────────────────────────╮
│                                      │
│  Gateway port: 18789                 │
│  Gateway bind: Loopback (127.0.0.1)  │
│  Gateway auth: Token (default)       │
│  Tailscale exposure: Off             │
│  Direct to chat channels.            │
│                                      │
├──────────────────────────────────────╯
Note: Make sure to never give direct Internet access to this port (tcp/18789)!
AI Model / Auth Provider
Now it gets a bit trickier: It's about to choose the LLM (Large Language Model), which OpenClaw should conntect to and use in the background.
If you're new to AI, there are multiple companies providing API access to LLM's. OpenAI is probably the most well known from the news, but there are many others such as Anthropic or xAI. OpenClaw supports a couple of these companies as "Model Providers". The Provider documentation lists the currently supported companies.
Note: OpenClaw also supports a locally running LLM (Ollama). But this is out of scope of this howto.
For this setup example, we have chosen Venice AI as Model Provider. To connect OpenClaw to Venice AI (or to another Provider), an API key is needed. To obtain this API key, you must sign up at the Model Provider and you must also purchase credits/tokens. Every request from OpenClaw to the LLM Provider uses these purchased tokens to pay for the LLM. Kind of a toll road.
Once you have signed up and purchased some credits/tokens at your Model Provider of choice, you create an API key. On Venice AI this can be done under "API". Give the API key a good description (e.g. OpenClaw) and make sure this API key is for "Inference" only (no elevated privileges). Copy and save the API key, as it will only be shown once.

Back in the terminal in the onboarding process, select your Model Provider and enter the API key. At the end, you can choose from different LLMs available at this provider.
Here we have the process for Venice AI, choosing the default model llama-3.3-70b:
◇  Model/auth provider
│  Venice AI
│
◇  Venice AI auth method
│  Venice AI API key
│
◇  Venice AI ────────────────────────────────────────────────────────────╮
│                                                                        │
│  Venice AI provides privacy-focused inference with uncensored models.  │
│  Get your API key at: https://venice.ai/settings/api                   │
│  Supports 'private' (fully private) and 'anonymized' (proxy) modes.    │
│                                                                        │
├────────────────────────────────────────────────────────────────────────╯
│
◇  Enter Venice AI API key
│  VENICE-INFERENCE-KEY-************************************eQ18nx
│
◇  Model configured ──────────────────────────╮
│                                             │
│  Default model set to venice/llama-3.3-70b  │
│                                             │
├─────────────────────────────────────────────╯
│
◇  Default model
│  Keep current (venice/llama-3.3-70b)
Channels + Skills
In the channel section, you are guided how to connect to a external communication tool, such as Slack or Signal. We might add a separate howto for connecting to an external channel. For this setup purpose we continue without choosing a channel.
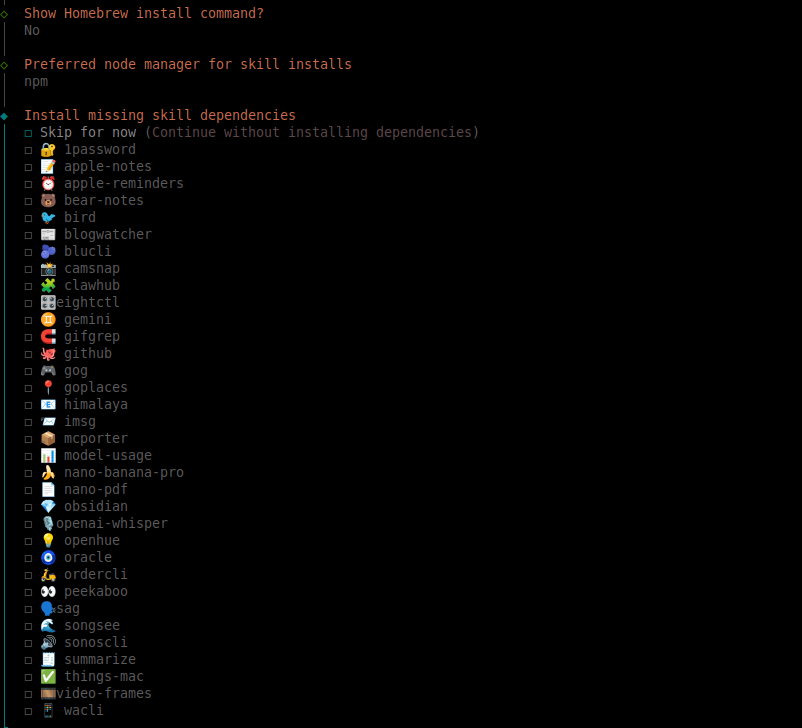
After continuing without selecting a channel, the onboard process asks to show the homebrew install command. We can skip this and say no.
The preferred node manager for skill install should be set to "npm".
Similar to channels, we can for now also skip the "skills". Use your arrow keys again and highlight "Skip for now" (with your [Space] bar). Then continue with [Enter].
Onboarding complete
After skipping the channels and skills, the remaining output is informational until the end of the onboarding process. There's some important information included, we need for later.

Ath the end of the onboard process, you're asked "how do you want to hatch your bot?". Choose "Do this later" as we will launch this manually afterwards.

Verify OpenClaw is running
At the end of the onboarding process (again: running as openclaw user) a process "openclaw-gateway" should now be running and listening on 127.0.0.1:18789:
openclaw@openclaw:~$ ss -lntup | grep openclaw
udp   UNCONN 0      0            0.0.0.0:5353       0.0.0.0:*    users:(("openclaw-gatewa",pid=26560,fd=27))
udp   UNCONN 0      0            0.0.0.0:5353       0.0.0.0:*    users:(("openclaw-gatewa",pid=26560,fd=21))
tcp   LISTEN 0      511        127.0.0.1:18789      0.0.0.0:*    users:(("openclaw-gatewa",pid=26560,fd=25))
tcp   LISTEN 0      511        127.0.0.1:18792      0.0.0.0:*    users:(("openclaw-gatewa",pid=26560,fd=32))
tcp   LISTEN 0      511            [::1]:18789         [::]:*    users:(("openclaw-gatewa",pid=26560,fd=26))
Use the following commands to control the gateway:
- openclaw gateway start => to start
- openclaw gateway stop => to stop
- openclaw gateway restart => to restart
Using openclaw status you can verify that OpenClaw's Gateway is correctly started:
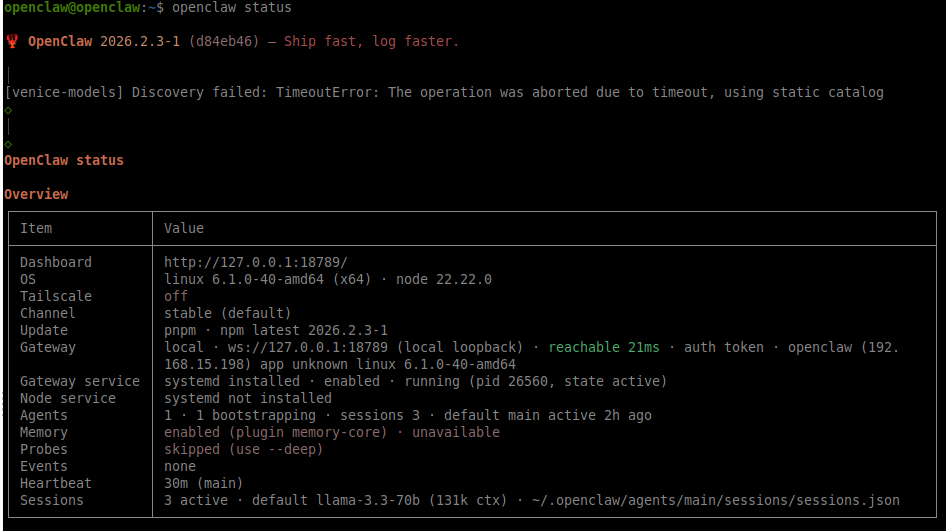
The onboard process also installed a systemd user service, located under ~/.config/systemd/user/openclaw-gateway.service. This service is usually triggered after OpenClaw is re-configured on the command line. You can verify the status of this service with the following command (as openclaw user):
openclaw@openclaw:~$ systemctl --user status openclaw-gateway.service
● openclaw-gateway.service - OpenClaw Gateway (v2026.2.3-1)
Loaded: loaded (/home/openclaw/.config/systemd/user/openclaw-gateway.service; enabled; preset: enabled)
Active: active (running) since Fri 2026-02-06 14:10:28 UTC; 21s ago
Invocation: 7535b203efe34520a161ba2b719b7f7b
Main PID: 172 (openclaw-gatewa)
Tasks: 11 (limit: 76096)
Memory: 1.3G (peak: 1.3G)
CPU: 22.173s
CGroup: /user.slice/user-1000.slice/[email protected]/app.slice/openclaw-gateway.service
└─172 openclaw-gateway
Feb 06 14:10:43 openclaw node[172]: 2026-02-06T14:10:43.528Z [canvas] host mounted at http://127.0.0.1:18789/__opencl>
Feb 06 14:10:43 openclaw node[172]: 2026-02-06T14:10:43.578Z [heartbeat] started
Feb 06 14:10:43 openclaw node[172]: 2026-02-06T14:10:43.581Z [gateway] agent model: venice/llama-3.3-70b
Feb 06 14:10:43 openclaw node[172]: 2026-02-06T14:10:43.583Z [gateway] listening on ws://127.0.0.1:18789 (PID 172)
Feb 06 14:10:43 openclaw node[172]: 2026-02-06T14:10:43.584Z [gateway] listening on ws://[::1]:18789
Feb 06 14:10:43 openclaw node[172]: 2026-02-06T14:10:43.586Z [gateway] log file: /tmp/openclaw/openclaw-2026-02-06.log
Feb 06 14:10:43 openclaw node[172]: 2026-02-06T14:10:43.600Z [browser/service] Browser control service ready (profile>
Feb 06 14:10:43 openclaw node[172]: 2026-02-06T14:10:43.609Z [slack] [default] starting provider
Feb 06 14:10:43 openclaw node[172]: 2026-02-06T14:10:43.959Z [slack] channels resolved: C0ADKUA4WHF→C0ADKUA4WHF
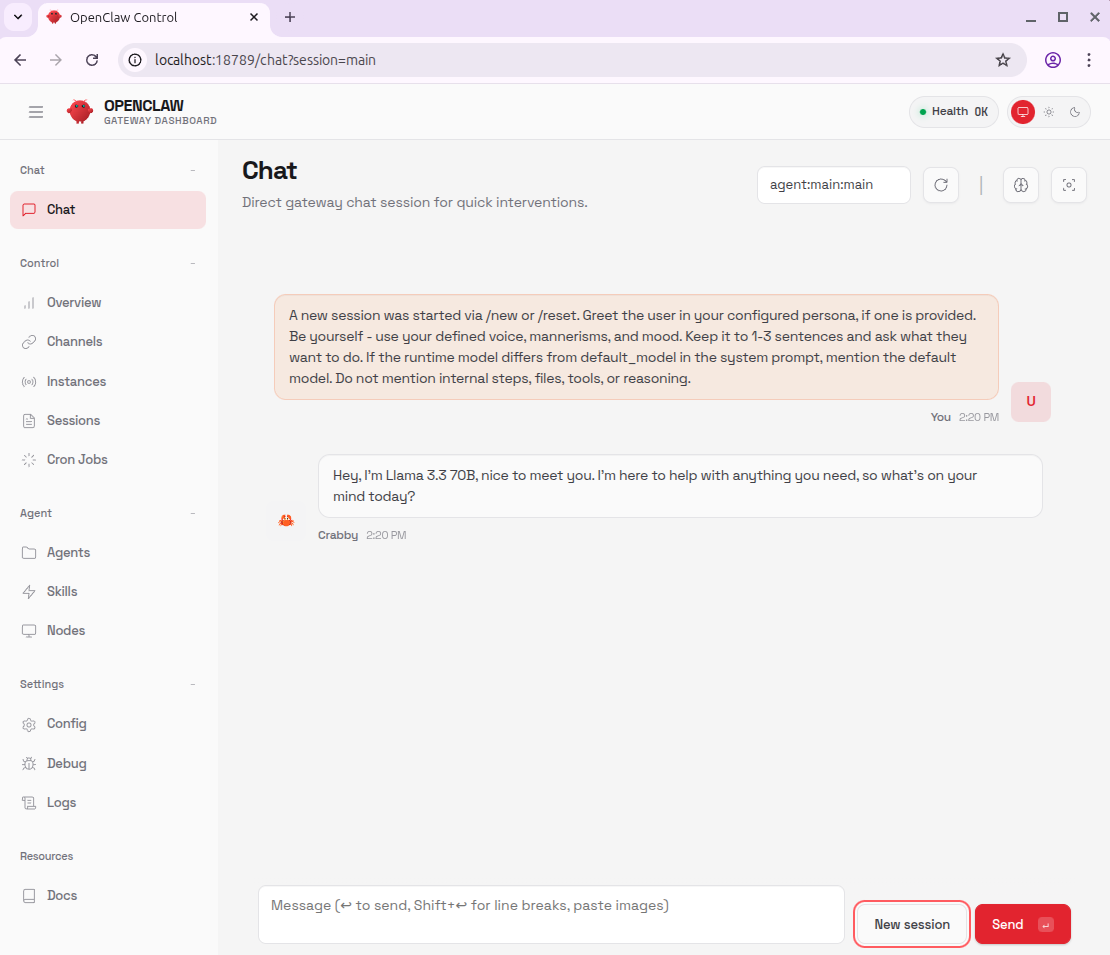
Feb 06 14:10:44 openclaw node[172]: 2026-02-06T14:10:44.197Z [slack] socket mode connectedUsing the TUI (Terminal User Interface)
Now that openclaw is running, we can connect to the TUI (Terminal User Interface), which is the chat interface to interact with your OpenClaw bot.
openclaw@openclaw:~$ openclaw tui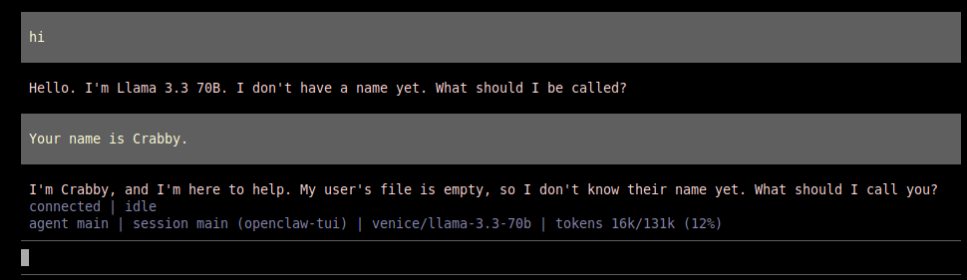
In my first conversation with OpenClaw, it asked how it should be called. I gave it the name "Crabby".
At the bottom of the TUI session the following information is shown:
 gateway connected | idle
 agent main | session main (openclaw-tui) | venice/llama-3.3-70b | tokens 16k/131k (12%)
This means that the TUI is connected to the gateway service (openclaw is running).
It also shows which Model Provider and which AI model is currently in use (venice/llama-3.3-70b).
The output at the end shows how many tokens have been used inside this session (tokens 16k/131k (12%)).
You can now directly interact with your OpenClaw bot on the command line using the TUI interface.
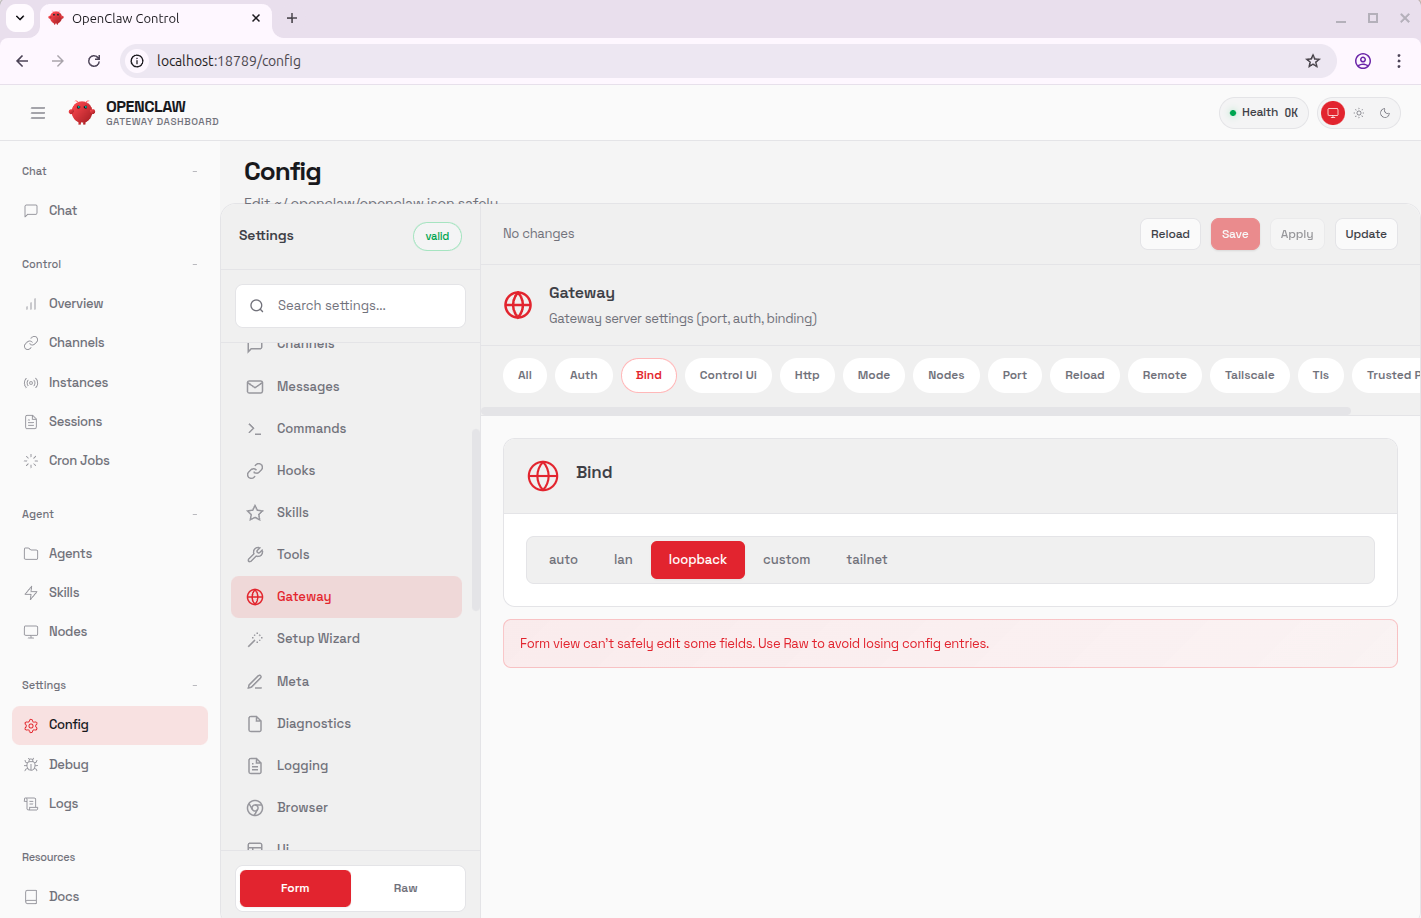
Using the Dashboard in Browser
In the output of the onboard process there are hints how to connect to the dashboard local port, using SSH port forwarding:
◇  Dashboard ready ────────────────────────────────────────────────────────────────╮
│                                                                                  │
│  Dashboard link (with token):                                                    │
│  http://127.0.0.1:18789/?token=6*********************************************7c  │
│  Copy/paste this URL in a browser on this machine to control OpenClaw.           │
│  No GUI detected. Open from your computer:                                       │
│  ssh -N -L 18789:127.0.0.1:18789 openclaw@<host>                                 │
│  Then open:                                                                      │
│  http://localhost:18789/                                                         │
│  http://localhost:18789/?token=6*********************************************7c  │
│  Docs:                                                                           │
│  https://docs.openclaw.ai/gateway/remote                                         │
│  https://docs.openclaw.ai/web/control-ui                                         │
│                                                                                  │
├──────────────────────────────────────────────────────────────────────────────────╯
You can use any SSH user for the port forwarding, it doesn't have to be the openclaw user. Here's with the root user, connecting to the virtual machine's IP (192.168.15.198):
ck@mint ~ $ ssh -L 18789:127.0.0.1:18789 [email protected]
root@openclaw:~#
With this tunnel in place, you can now open a browser on your machine and open the link mentioned in the output above. Use the localhost link with the appended token.
Similar to the TUI, you can directly interact with the OpenClaw bot in the browser.
Besides the Chat function, the Dashboard can also be used to configure OpenClaw. And you can also consult the logs from here, which can be quite helpful to debug issues.
Gotchas
While using OpenClaw, a couple of issues turned up. It took a bit of time to understand why they were happening and getting to fix them.
No output (empty replies) in the chat
If you are interacting with the bot on the Dashboard (browser) and you see empty replies, this is most likely caused by either a wrong API key towards the AI Model Provider or that you ran out of tokens.
It helps to use the TUI in such a case, as it seems to work a bit better and shows the actual error message:

The solution is to re-enter the API key (you can run openclaw onboard again) or to log in at your AI Provider (venice.ai in our example) to verify there's still token budget.
Not able to search for information on the Internet
By default OpenClaw is not able to look for information on the Internet, as it requires an API key for the Brave Search Engine. When prompted to search for information, the bot then responds with a message similar to this:
I'm not able to search for information about XYZ right now because I don't have access to the Brave Search API.
The solution is to sign up at Brave Search API and then subscribe to a plan. The free plan is perfect for trying out OpenClaw and allows up to 2000 requests per month.
Once you've subscribed to a plan (note: even the Free plan requires a credit card) you can create an API key. Create a key and copy it (starts with BSA….).
Back on the cli on our OpenClaw server, run the following command as openclaw user:
openclaw@openclaw:~$ openclaw configure --section webAnswer the following questions:
- Where will the Gateway run? => Local (this machine)
- Enable web search (Brave Search)? => Yes
- Brave Search API key => Enter the Brave API Key created before (BSA……………)
- Enable web_fetch (keyless HTTP fetch)? => Yes
From now on, OpenClaw should be able to search for information on the Internet.
OpenClaw burns a lot of tokens
After a couple of interactions with OpenClaw you might realize how quickly it uses AI tokens. At the same time your token budget at your chosen AI provider reduces quickly.
One of the reason is that OpenClaw currently wastes over 90% of token budget – for nothing. OpenClaw injects its workspace files (from ~/.openclaw/workspace) on every single message in a session. This causes massive token waste, according to GitHub user ivanenev::
- ~35,600 tokens injected per message (workspace context files)
- Cost impact: ~$1.51 wasted per 100-message session
- Token waste: 3.4 million tokens per 100 messages
- Cache inefficiency: Prompt cache writes triggered repeatedly for static content
The mentioned user has proposed a change in the code, which removes the continuous injection of the whole workspace and greatly reduces token usage/costs.
As of writing this tutorial on February 6th 2026, the relevant pull request #9157 has not yet been merged into OpenClaw.
Update OpenClaw
As OpenClaw installs itself (by default) using the Node package manager (npm) and installs the packages globally. If you try to update the packages as openclaw user you run into an error similar like this:
openclaw@openclaw:~$ openclaw update
Update Result: ERROR
  Root: /usr/lib/node_modules/openclaw
  Reason: global update
  Before: 2026.2.3-1
  After: 2026.2.3-1
Total time: 10.5s
Instead run the same command as root or as a user with sudo:
root@openclaw:~# openclaw update
Updating OpenClaw...
◇  ✓ Updating via package manager (18.9s)
Update Result: OK
  Root: /usr/lib/node_modules/openclaw
  Before: 2026.2.3-1
  After: 2026.2.3-1
Total time: 19.0s
Next step: Slack integration
In the next article, we'll show how to connect OpenClaw with your Slack workspace and chat directly with the bot within Slack channels.


