Sometimes you may want to "redirect" network traffic. You could be running your own web server or web application and you want to make your web server available on your (current) public IP address. Or you are running a surveillance camera you want to access over the Internet. Such use case examples can be achieved with port forwarding.

Port forwarding setup in routers
Most Internet routers allow you to do this in the User Interface, by setting a "public port" and an "internal destination" for that port:
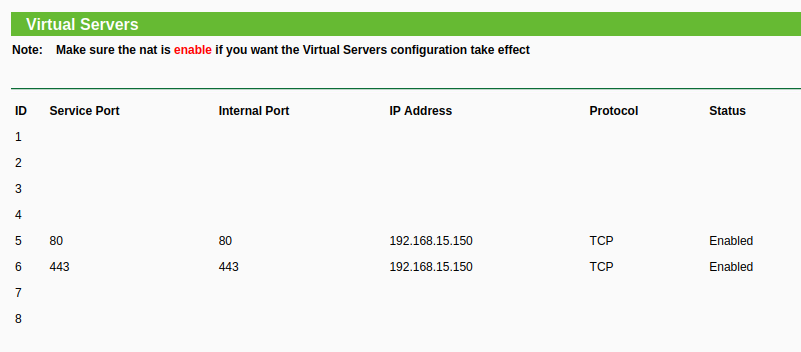
In this example, the TP-Link Archer router is capable of defining port forwarding using:
- Service Port: The public port, reachable over Internet
- Internal Port: To which internal port should the public port be forwarded to
- IP Address: The IP address in the internal network (LAN) of the destination device
- Protocol: Either all, udp or tcp
- Status: Either disable or enable this port forwarding
With a port forwarding defined, the router will now "listen" on the public port and incoming traffic will be forwarded to the internal IP address.
But some routers don't allow setting an internal port, such as an older TP-Link R402M router:

In such a situation you could either look for a newer router/device – or you can use a Linux machine in your internal network to take over port forwarding!
Port forwarding with a central Linux machine using iptables
As mentioned above, some routers don't allow setting an internal port. If you have a Linux machine in your internal network, you can make this Linux machine your "central port forwarding" machine.
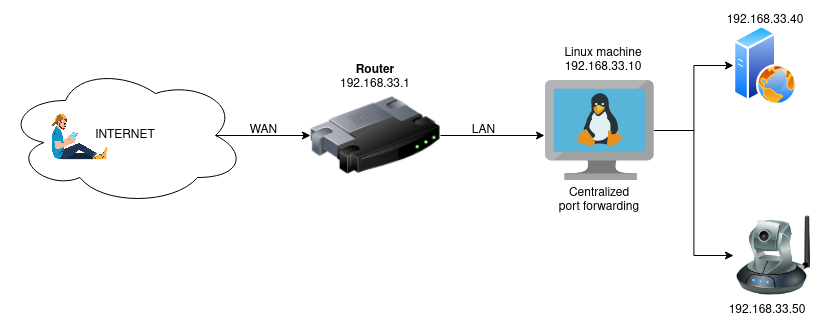
On your router, set the port forwarding to the IP address of your Linux machine. In some routers you can also define a so-called DMZ host, where you enter the IP address of your Linux machine. With the DMZ option, all ports are automatically forwarded to the defined DMZ host.
Then, on the Linux machine, you can configure port forwarding using the iptables command.
DNAT (Destination NAT)
When working with the iptables command (or in general working on Linux machines firewall rules), a port forwarding is more correctly called a DNAT (Destination Network Address Translation). The incoming request is translated into a new address/port.
Create DNAT rules with iptables
Use the following iptables command to create a DNAT from public port 80 to our internal web server (192.168.33.20), also using port 80 as destination port:
root@server:~# iptables -t nat -A PREROUTING -p tcp -m tcp --dport 80 -j DNAT --to-destination 192.168.33.20:80Let's assume we have a second web server in the internal network (192.168.33.40). We can use another public port (8080) for this second web server:
root@server:~# iptables -t nat -A PREROUTING -p tcp -m tcp --dport 8080 -j DNAT --to-destination 192.168.33.40:80The rules can now be listed using iptables -nvL -t nat:
root@server:~# iptables -nvL -t nat
Chain PREROUTING (policy ACCEPT 1 packets, 189 bytes)
 pkts bytes target     prot opt in     out     source               destination
    0     0 DNAT       tcp  --  eth0   *       0.0.0.0/0            0.0.0.0/0            tcp dpt:80 to:192.168.33.20:80
    0     0 DNAT       tcp  --  eth0   *       0.0.0.0/0            0.0.0.0/0            tcp dpt:8080 to:192.168.33.40:80
[...]
Don't forget the SNAT (masquerading) rule!
The DNAT rules created above are "enough" to make the port forwarding, however the response traffic from the web server(s) will never reach the client. We first need to "reverse translate" the response with a SNAT (Source Network Address Translation) rule.
Without a SNAT, you can see incoming traffic using tcpdump but you will never see a response:
root@server:~# tcpdump -i eth0 port 8080
tcpdump: verbose output suppressed, use -v or -vv for full protocol decode
listening on eth0, link-type EN10MB (Ethernet), capture size 262144 bytes
07:41:35.219270 IP ftth-10-136.example.com.43620 > 192.168.33.10.8080: Flags [S], seq 2531537116, win 64240, options [mss 1460,sackOK,TS val 1621582232 ecr 0,nop,wscale 7], length 0
07:41:35.219392 IP ftth-10-136.example.com.43642 > 192.168.33.10.8080: Flags [S], seq 3669606903, win 64240, options [mss 1460,sackOK,TS val 1621582232 ecr 0,nop,wscale 7], length 0
07:41:35.220213 IP ftth-10-136.example.com.43630 > 192.168.33.10.8080: Flags [S], seq 4002383342, win 64240, options [mss 1460,sackOK,TS val 1621582232 ecr 0,nop,wscale 7], length 0
The easiest way is to generally enable SNAT masquerading is the following command:
root@server:~# iptables -t nat -A POSTROUTING -j MASQUERADEYou can verify the added SNAT firewall rule in the POSTROUTING chain of the NAT table:
root@server:~# iptables -nvL -t nat
Chain PREROUTING (policy ACCEPT 1 packets, 189 bytes)
 pkts bytes target     prot opt in     out     source               destination
    0     0 DNAT       tcp  --  eth0   *       0.0.0.0/0            0.0.0.0/0            tcp dpt:80 to:192.168.33.20:80
    0     0 DNAT       tcp  --  eth0   *       0.0.0.0/0            0.0.0.0/0            tcp dpt:8080 to:192.168.33.40:80

Chain INPUT (policy ACCEPT 2 packets, 112 bytes)
 pkts bytes target     prot opt in     out     source               destination

Chain OUTPUT (policy ACCEPT 0 packets, 0 bytes)
 pkts bytes target     prot opt in     out     source               destination

Chain POSTROUTING (policy ACCEPT 0 packets, 0 bytes)
 pkts bytes target     prot opt in     out     source               destination
    0     0 MASQUERADE  all  --  *      *       0.0.0.0/0            0.0.0.0/0
Save the iptables rules
To make the just created DNAT and SNAT rules boot-resistant, these iptables rules should be saved using the iptables-persistant helper tools. On Debian and Ubuntu systems, you can install the package:
root@server:~# apt install iptables-persistentThis package installs additional commands, such as iptables-save and iptables-restore. You can now save the current iptables rule set:
root@server:~# iptables-save > /etc/iptables/rules.v4The saves iptables rules will automatically be loaded after a reboot by iptables-restore.


