Everyone has one: An Internet router. Whether you have a cable-only or a wireless router, it's your own personal gateway from your internal network to the Internet.
Although a router's life can be pretty long, there's a (security) problem with it: Once the router model is replaced by newer models, the older models don't get any firmware updates anymore. Your internal network can and will become vulnerable to security holes – by using your own central piece of network – the router.
OpenWRT to the rescue!
Luckily a couple of years ago (in 2004 already), OpenWRT was created. OpenWRT is a software (firmware) replacement of the pre-installed firmware from the router vendors. From the wiki:
The OpenWrt Project is a Linux operating system targeting embedded devices. Instead of trying to create a single, static firmware, OpenWrt provides a fully writable filesystem with package management. This frees you from the application selection and configuration provided by the vendor and allows you to customize the device through the use of packages to suit any application.
OpenWRT is actively developed and receives new features and security fixes. This revives your old router – if it is supported (see list of supported OpenWRT hardware). You can of course also install OpenWRT on a newer router (check the same hardware compatibility list).
If your router is on the list of supported hardware then you can proceed. Check out the dedicated OpenWRT wiki page for each supported device. They contain important information and hints about each router.
Installing OpenWRT on a AVM Fritz!Box
Reset warning
Installing a different firmware on your router will delete all previous configurations and settings! Make sure to note down all your existing configurations, such as port forwarding, vpn settings, etc.
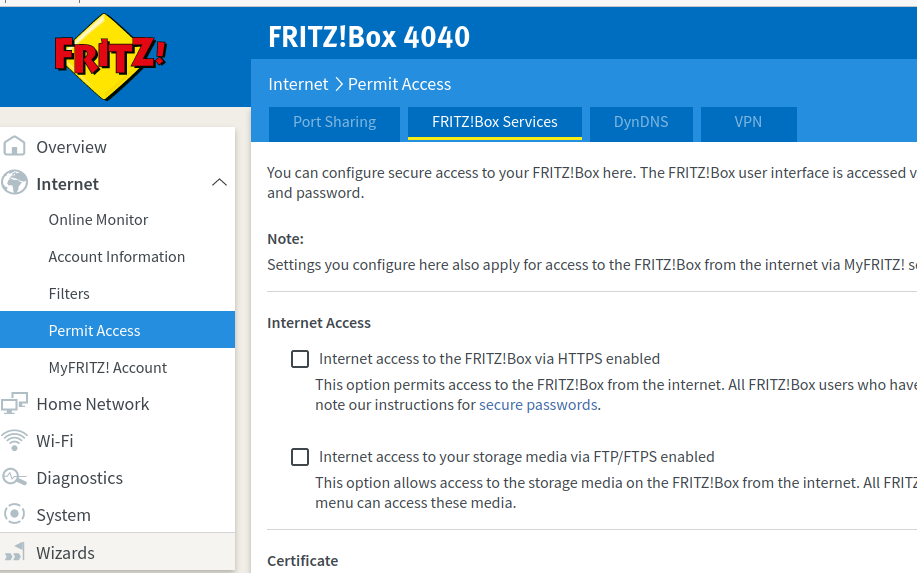
In this example I am installing the current OpenWRT version (22.03.5) on a AVM Fritz!Box 4040 Internet router. The original user interface looks like this:
The recommended way to install a new firmware on the router is to use the "fritzflash" Python script.
Note: Fritzflash is available for Linux, macOS and Windows.
Preparations / Download
On my notebook, running Linux Mint 21, I prepared a path and downloaded the fritzflash Python script:
ck@mint:~$ cd Downloads/
ck@mint:~/Downloads$ mkdir FritzFlash
ck@mint:~/Downloads$ cd FritzFlash/
ck@mint:~/Downloads/FritzFlash$ wget https://raw.githubusercontent.com/freifunk-darmstadt/fritz-tools/master/fritzflash.py
--2023-06-17 08:54:51--  https://raw.githubusercontent.com/freifunk-darmstadt/fritz-tools/master/fritzflash.py
Resolving raw.githubusercontent.com (raw.githubusercontent.com)... 185.199.110.133, 185.199.108.133, 185.199.111.133, ...
Connecting to raw.githubusercontent.com (raw.githubusercontent.com)|185.199.110.133|:443... connected.
HTTP request sent, awaiting response... 200 OK
Length: 12484 (12K) [text/plain]
Saving to: ‘fritzflash.py’

fritzflash.py       100%[===================>]  12.19K  --.-KB/s    in 0s

2023-06-17 08:54:51 (53.4 MB/s) - ‘fritzflash.py’ saved [12484/12484]
Now download the latest compatible OpenWRT release for the device:
ck@mint:~/Downloads/FritzFlash$ wget https://downloads.openwrt.org/releases/22.03.5/targets/ipq40xx/generic/openwrt-22.03.5-ipq40xx-generic-avm_fritzbox-4040-squashfs-eva.bin
--2023-06-17 08:59:11--  https://downloads.openwrt.org/releases/22.03.5/targets/ipq40xx/generic/openwrt-22.03.5-ipq40xx-generic-avm_fritzbox-4040-squashfs-eva.bin
Resolving downloads.openwrt.org (downloads.openwrt.org)... 168.119.138.211, 2a01:4f8:251:321::2
Connecting to downloads.openwrt.org (downloads.openwrt.org)|168.119.138.211|:443... connected.
HTTP request sent, awaiting response... 200 OK
Length: 7602180 (7.2M) [application/octet-stream]
Saving to: ‘openwrt-22.03.5-ipq40xx-generic-avm_fritzbox-4040-squashfs-eva.bin’

openwrt-22.03.5-ipq 100%[===================>]   7.25M  9.22MB/s    in 0.8s

2023-06-17 08:59:12 (9.22 MB/s) - ‘openwrt-22.03.5-ipq40xx-generic-avm_fritzbox-4040-squashfs-eva.bin’ saved [7602180/7602180]
Preparing your notebook for firmware installation
Fritzflash needs to run over a wired network. This is why I chose to use my notebook for the installation of OpenWRT. Change the IP address of the cabled network connection to a static IP address: 192.168.178.2.
Fritz!Box default internal network range
The AVM Fritz!Box devices use by default an internal network range of 192.168.178.0/24. If you configured a different network range, adjust your notebook's IP address to be in the same network range as your router.
Now make sure your notebook is connected to the router, either by patching the network cable directly to one of the router's network ports or by using an additional switch in between. Make sure you are able to ping your router.
Run FritzFlash / install OpenWRT
Once your notebook is patched to the router's internal network you can execute the FritzFlash Python script:
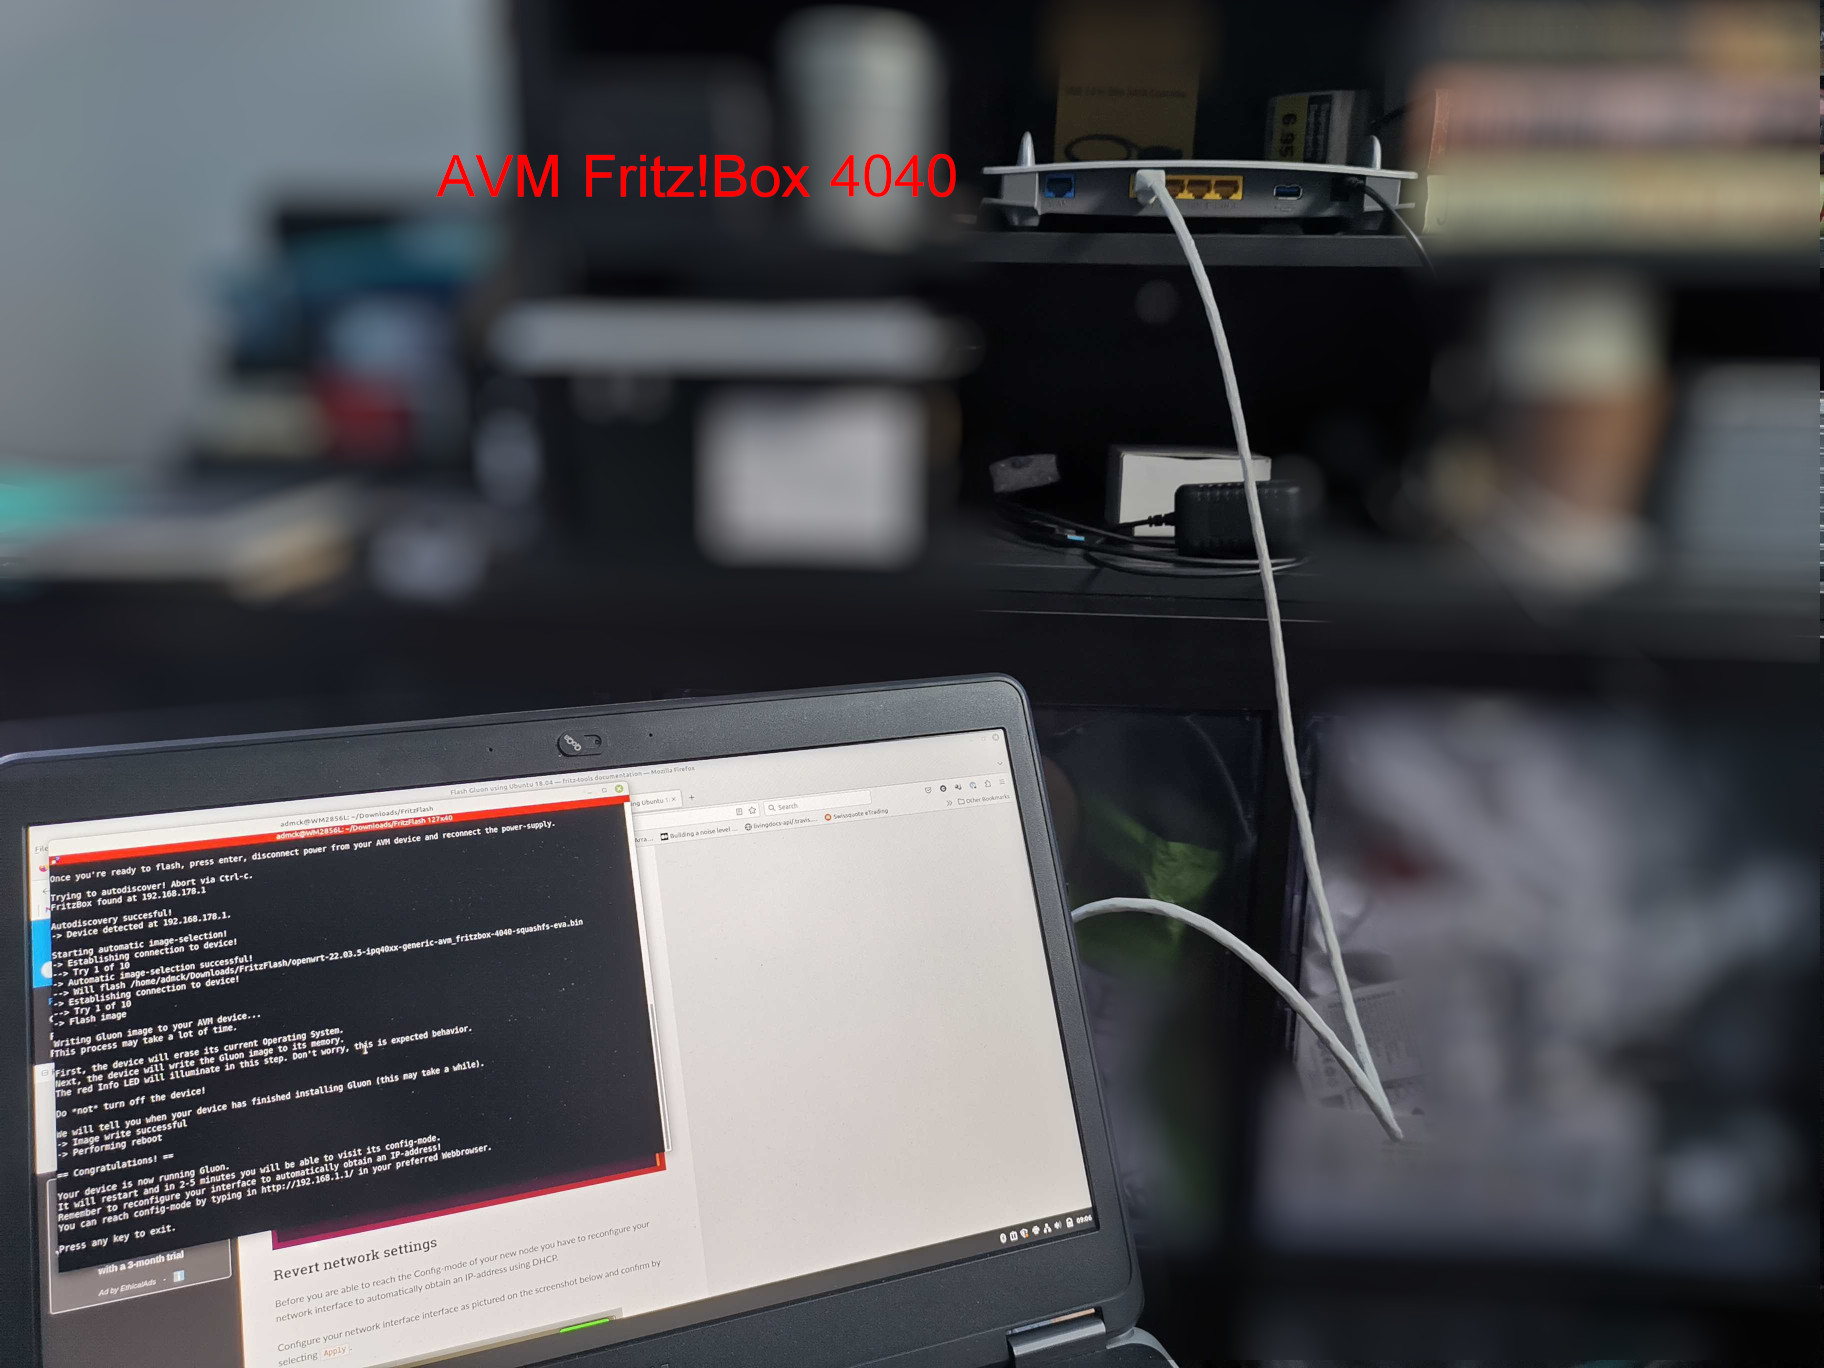
ck@mint:~/Downloads/FritzFlash$ python3 fritzflash.py
This program will help you installing Gluon, a widely used Firmware for Freifunk networks, onto your AVM device.
You can always find the most current version of this script at https://www.github.com/freifunk-darmstadt/fritz-tools

It is strongly recommended to only connect your computer to the device you want to flash.
Try to disable all other connections (Ethernet, WiFi/WLAN, VMs) if detection fails.

Sometimes an unmanaged switch between your AVM device and your computer is helpfull.

Before we start, make sure you have assigned your PC a static IP Address in the Subnet of the device you want to flash.
The following example would be a completely fine option:

IP-Address: 192.168.178.2
Subnet: 255.255.255.0
Gateway: 192.168.178.1
DNS Servers: Leave blank

Once you're ready to flash, press enter, disconnect power from your AVM device and reconnect the power-supply. [ENTER]

Trying to autodiscover! Abort via Ctrl-c.
Now you would probably expect that the script automatically detects the Fritz!Box (I did). But the hint at the bottom is actually an action you need to perform: While FritzFlash is trying to autodiscover the Fritz!Box in your network, remove the power cable from the router, wait 2-3 seconds, then re-connect the power cable. Only this way the FritzFlash script will be able to discover the Fritz!Box.
The script will then continue with flashing the new firmware (which is the OpenWRT bin file). The output will change accordingly:
Autodiscovery succesful!
-> Device detected at 192.168.178.1.

Starting automatic image-selection!
-> Establishing connection to device!
--> Try 1 of 10
-> Automatic image-selection successful!
--> Will flash /home/ck/Downloads/FritzFlash/openwrt-22.03.5-ipq40xx-generic-avm_fritzbox-4040-squashfs-eva.bin
-> Establishing connection to device!
--> Try 1 of 10
-> Flash image

Writing Gluon image to your AVM device...
This process may take a lot of time.

First, the device will erase its current Operating System.
Next, the device will write the Gluon image to its memory.
The red Info LED will illuminate in this step. Don't worry, this is expected behavior.

Do *not* turn off the device!

We will tell you when your device has finished installing Gluon (this may take a while).
-> Image write successful
-> Performing reboot

== Congratulations! ==

Your device is now running Gluon.
It will restart and in 2-5 minutes you will be able to visit its config-mode.
Remember to reconfigure your interface to automatically obtain an IP-address!
You can reach config-mode by typing in http://192.168.1.1/ in your preferred Webbrowser.

Press any key to exit.
Opening OpenWRT GUI in browser
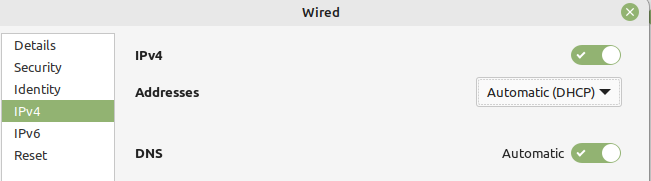
First you need to change the notebook's IP configuration again. This time remove the static IP address and switch to DHCP. Your machine should automatically receive a new IP address from the router now running OpenWRT. The default network range is 192.168.1.0/24.
Once your machine has received an IP address from OpenWRT, you can access the OpenWRT GUI by using your browser; use the address https://192.168.1.1 in the browser. You will be greeted by a login prompt (you may need to accept a self-signed certificate first in case your browser shows a warning).
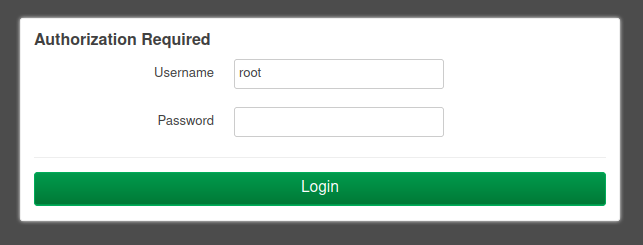
The default login is "root" as user name and an empty password. Just click on the "Login" button and you are logged in. You will see the OpenWRT status page.
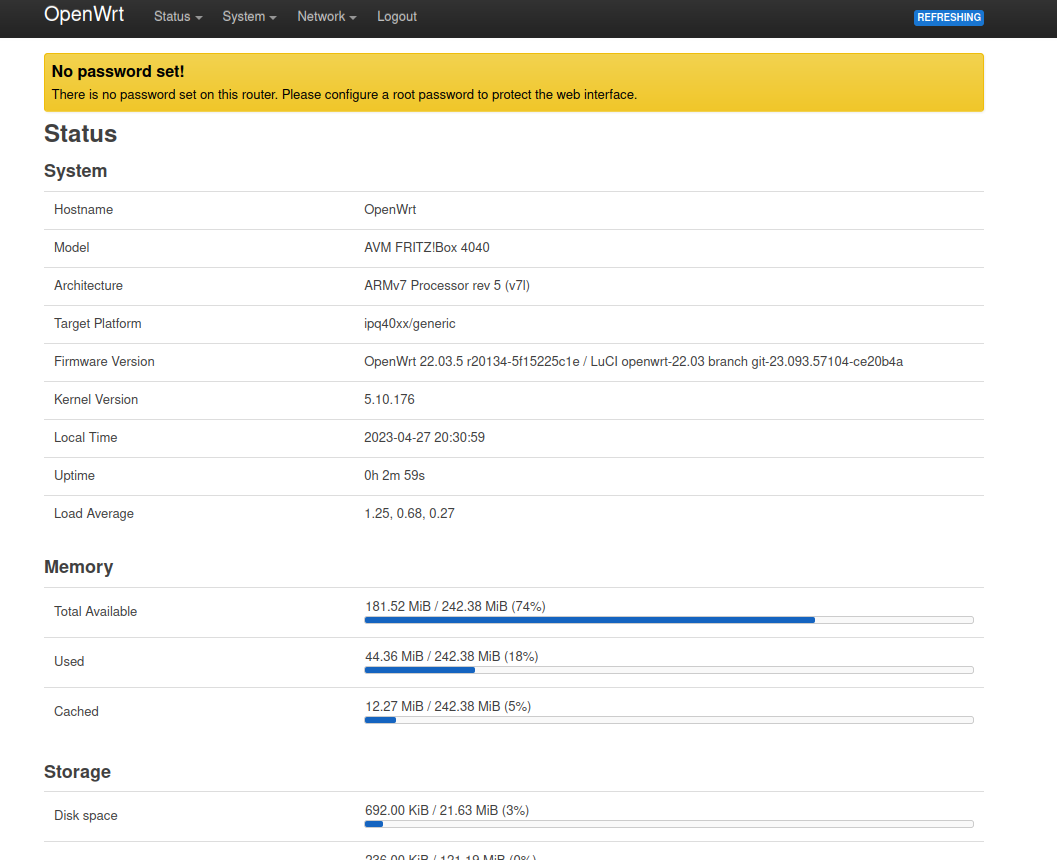
Congratulations! You can now configure your router using the OpenWRT user interface. Start by setting a new password for the root user (System -> Router Password).
Advanced hint: You can also enable the SSH service and access the router using SSH. The credentials are the same as on the GUI in the browser. Additionally you can add public SSH keys for improved SSH login security.


