Creating a bootable USB stick on Linux can sometimes be a pain, depending on the ISO image and how it is built.
The tech-savvy people comfortable using the command line would probably chose the dd (disk dump) command to copy the ISO to a USB stick:
$ sudo dd if=~/Downloads/KNOPPIX_V9.1DVD-2021-01-25-EN.iso of=/dev/sdd bs=4096But Knoppix is an excellent example that this is not enough. The chances are high that this USB stick will not boot (mostly due to a problem of internal naming of its own drive).
There are a bunch of alternatives, such as unetbootin, but here too I experienced boot issues with the stick – depending on the source image.
However with the program mintstick, which is part of every recent Linux Mint release, I have (so far) only made great experiences!
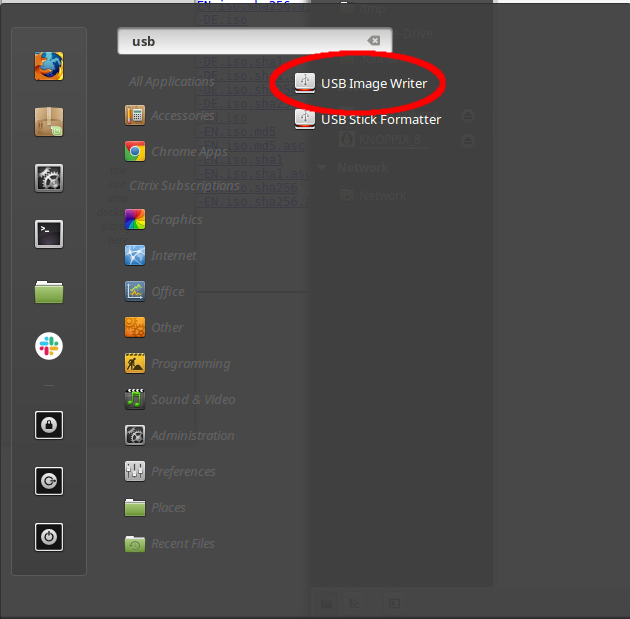
Create a bootable USB stick with mintstick
If you're on a Linux Mint machine, simply enter "USB Image" in the menu and the "USB Image Writer" should show up in the list. Another way is to use a right-click on an ISO file and select "Make bootable USB stick" from the context menu.
Note: If it doesn't show up, make sure you have the "mintstick" package installed.
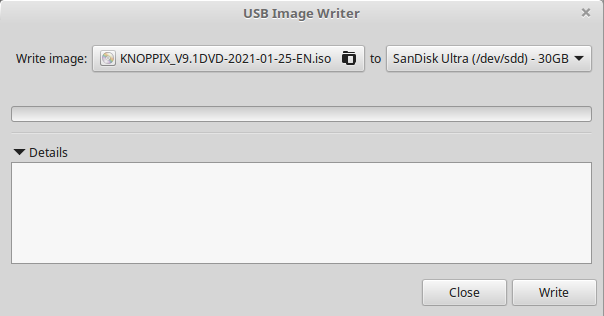
The program itself is very minimalistic and, honestly, there is no reason why it should offer a ton of options. Simply select the source ISO image and select the target drive (USB stick) and click on write. The program might ask for sudo permission before starting.
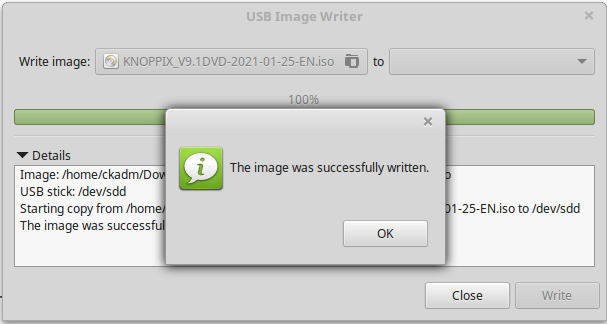
Once the ISO was written to the USB stick, the program informs and the USB Image Writer can be closed.
This works very well for all ISO images. I have yet to find an ISO where this did not work.
What happened under the hood?
By looking at the new partition table of our USB stick (/dev/sdd), we can see that three partitions were created:
ck@mint ~ $ sudo fdisk -l /dev/sdd
Disk /dev/sdd: 28.7 GiB, 30752636928 bytes, 60063744 sectors
Units: sectors of 1 * 512 = 512 bytes
Sector size (logical/physical): 512 bytes / 512 bytes
I/O size (minimum/optimal): 512 bytes / 512 bytes
Disklabel type: dos
Disk identifier: 0x6d716f2f

Device     Boot   Start     End Sectors  Size Id Type
/dev/sdd1  *         64 9126431 9126368  4.4G  0 Empty
/dev/sdd2       9126432 9161247   34816   17M ef EFI (FAT-12/16/32)
/dev/sdd3       9161248 9169439    8192    4M 83 Linux
The first partition received the bootable flag. There is also a dedicated EFI partition (for UEFI boot support) and a 4MB small third partition which is a reiserfs formatted partition and serves as writable partition when using the booted stick. It will automatically extend to use the rest of the disk.
What about other Linux distributions?
The mintstick package can easily be installed on all other Debian-based Linux installations, including all Ubuntu derivatives.
One way is to add a PPA (Personal Package Archive) to the APT repository list. The "Linux Mint Daily Builds" PPA also contains the newest release of mintstick.
Another way is to directly download the deb package from the Linux Mint packages server and install the package using dpkg -i.
And another alternative is to clone the public code repository on GitHub and build your own deb package.


[…] downloaded you can create a bootable media. Either by burning the ISO to a CD/DVD, or create a bootable USB stick. Or, as in my case, just use the ISO as file for the virtual […]