Goodbye, Ubuntu Xenial Xerus!
In these days the widely used Linux distribution Ubuntu 16.04, code named Xenial Xerus, will be end of life (EOL) and won't receive any updates anymore. Looking at the EOL date of the previous LTS versions 14.04 (April 25th 2019) and 12.04 (April 28th 2017), the EOL date of 16.04 will probably be set to April 28th or 29th.
Canonical, the company behind Ubuntu, continue to support 16.04 LTS for another 3 years for paying customers through the Extended Security Maintenance plan.
Although an upgrade of Ubuntu 16.04 to a newer LTS version, such as 18.04 or 20.04, usually works very well, there are always some gotchas. The base system around the Linux Kernel, such as login, shell and filesystems usually don't change too much – making an upgrade painless. However packages from the repositories contain newer application versions. And this is where the gotchas are.
We've put together a list of applications to watch out for when upgrading from Ubuntu 16.04 to the currently newest Ubuntu 20.04 LTS.

MySQL 8
Ubuntu 16.04 (Xenial) used the MySQL 5.7 version which has been around for a while and is still supported by Oracle. However with the upgrade to Ubuntu 20.04 (Focal), MySQL received a drastic change: MySQL is now installed as version 8.0.
For new applications and empty databases this might be alright, but for existing applications there are some breaking changes. Especially the way the (default) user authentication works on MySQL 8.x has changed a lot. This could potentially break applications using a MySQL database – at least it would mean that the applications all need to support the newer (and more secure) authentication method.
A downgrade to MySQL 5.7 is possible, however not by using the Ubuntu repositories. Follow the article "Install MySQL 5.7 on Ubuntu 20.04 Focal (and properly avoid MySQL 8.0 packages)" for a how to guide.
Nginx
Nginx also has made a big version jump. In Xenial, Nginx was installed with version 1.10.0. In the new Ubuntu Focal, Nginx 1.18.0 is installed from the Ubuntu repositories.
Luckily almost all Nginx configuration should still work, however there are some major changes under the hood, mainly how modules are packaged and loaded into Nginx. Also see article "Important Nginx configuration changes after upgrading Ubuntu from 16.04 to 20.04" for a more detailled description.
Dynamic module loading
Since Ubuntu 18.04 (Bionic), the modules are loaded dynamically instead of hard-compiled into the Nginx binary. You can spot the difference by using dpkg and checking for the installed Nginx packages.
ck@ubuntu1604:~$ dpkg -l|grep nginx
ii  nginx-common                          1.10.3-0ubuntu0.16.04.4                    all          small, powerful, scalable web/proxy server - common files
ii  nginx-extras                          1.10.3-0ubuntu0.16.04.4                    amd64        nginx web/proxy server (extended version)

ck@ubuntu1804:~$ dpkg -l|grep nginx
ii  libnginx-mod-http-auth-pam             1.14.0-0ubuntu1.7                               amd64        PAM authentication module for Nginx
ii  libnginx-mod-http-cache-purge          1.14.0-0ubuntu1.7                               amd64        Purge content from Nginx caches
ii  libnginx-mod-http-dav-ext              1.14.0-0ubuntu1.7                               amd64        WebDAV missing commands support for Nginx
ii  libnginx-mod-http-echo                 1.14.0-0ubuntu1.7                               amd64        Bring echo and more shell style goodies to Nginx
ii  libnginx-mod-http-fancyindex           1.14.0-0ubuntu1.7                               amd64        Fancy indexes module for the Nginx
ii  libnginx-mod-http-geoip                1.14.0-0ubuntu1.7                               amd64        GeoIP HTTP module for Nginx
ii  libnginx-mod-http-headers-more-filter  1.14.0-0ubuntu1.7                               amd64        Set and clear input and output headers for Nginx
ii  libnginx-mod-http-image-filter         1.14.0-0ubuntu1.7                               amd64        HTTP image filter module for Nginx
ii  libnginx-mod-http-lua                  1.14.0-0ubuntu1.7                               amd64        Lua module for Nginx
ii  libnginx-mod-http-ndk                  1.14.0-0ubuntu1.7                               amd64        Nginx Development Kit module
ii  libnginx-mod-http-perl                 1.14.0-0ubuntu1.7                               amd64        Perl module for Nginx
ii  libnginx-mod-http-subs-filter          1.14.0-0ubuntu1.7                               amd64        Substitution filter module for Nginx
ii  libnginx-mod-http-uploadprogress       1.14.0-0ubuntu1.7                               amd64        Upload progress system for Nginx
ii  libnginx-mod-http-upstream-fair        1.14.0-0ubuntu1.7                               amd64        Nginx Upstream Fair Proxy Load Balancer
ii  libnginx-mod-http-xslt-filter          1.14.0-0ubuntu1.7                               amd64        XSLT Transformation module for Nginx
ii  libnginx-mod-mail                      1.14.0-0ubuntu1.7                               amd64        Mail module for Nginx
ii  libnginx-mod-nchan                     1.14.0-0ubuntu1.7                               amd64        Fast, flexible pub/sub server for Nginx
ii  libnginx-mod-stream                    1.14.0-0ubuntu1.7                               amd64        Stream module for Nginx
ii  nginx-common                           1.14.0-0ubuntu1.7                               all          small, powerful, scalable web/proxy server - common files
ii  nginx-extras                           1.14.0-0ubuntu1.7                               amd64        nginx web/proxy server (extended version)
This also means that the Nginx main configuration file (/etc/nginx/nginx.conf) needs to be adjusted. The upgrade process does install a new nginx.conf – unless you chose to keep the existing configuration file (which makes sense in a lot of servers). The following include line must exist now at the top of the config file:
ck@ubuntu:~$ head -n 4 /etc/nginx/nginx.conf
user www-data;
worker_processes auto;
pid /run/nginx.pid;
include /etc/nginx/modules-enabled/*.conf;
Without this include line, Nginx will fail to (re-) start when additional modules, such as GeoIP, are required.
Enabling SSL
The way SSL is enabled in a server context (virtual host) has also changed. Although the old style (using ssl on;) still works, it is marked as deprecated. That's the perfect (and last) moment to change the configuration.
In the old configuration style, SSL was enabled in the following way:
root@ubuntu:~# cat /etc/nginx/sites-enabled/api.example.com.conf
server {
  listen 443;
  server_name api.example.com;
  access_log /var/log/nginx/api.example.com.access.log include_ssl_params;
  error_log /var/log/nginx/api.example.com.error.log;

  ssl on;
  ssl_certificate /etc/nginx/ssl.crt/wildcard.example.com.crt;
  ssl_certificate_key /etc/nginx/ssl.key/wildcard.example.com.key;
[...]
The new way is to add an ssl keyword in the listen configuration:
root@ubuntu:~# cat /etc/nginx/sites-enabled/api.example.com.conf
server {
  listen 443 ssl;
  server_name api.example.com;
  access_log /var/log/nginx/api.example.com.access.log include_ssl_params;
  error_log /var/log/nginx/api.example.com.error.log;

  ssl_certificate /etc/nginx/ssl.crt/wildcard.example.com.crt;
  ssl_certificate_key /etc/nginx/ssl.key/wildcard.example.com.key;
[...]
New TLS 1.3
Nginx 1.18.0 on Focal also adds (by default) a new TLS version: TLSv1.3. This means that the ssl_protocols configuration parameter now allows and should be extended with TLSv1.3:
ck@ubuntu2004:~$ cat /etc/nginx/nginx.conf | grep ssl_protocols
    ssl_protocols TLSv1 TLSv1.1 TLSv1.2 TLSv1.3; # Dropping SSLv3, ref: POODLE
Note that the Ubuntu-provided nginx.conf still contains the deprecated TLS protocols 1.0 and 1.1. For security reasons, only TLSv1.2 and TLSv1.3 should be enabled.
Crash on logrotate
In Xenial, the default logrotate command to reload Nginx is set to invoke-rc.d nginx rotate. However under certain conditions, Nginx's default logrotate configuration on 16.04 did not work. When this command was replaced by service nginx reload, the log rotation worked correctly.
However after an upgrade to Ubuntu 20.04 and with the adjusted logrotate config (using service nginx reload) still in place, this will now crash Nginx.
Mar  7 00:00:11 focal systemd[1]: logrotate.service: Succeeded.
Mar  7 00:00:11 focal systemd[1]: Finished Rotate log files.
Mar  7 00:00:13 focal systemd[1]: nginx.service: Main process exited, code=dumped, status=11/SEGV
Mar  7 00:00:13 focal systemd[1]: nginx.service: Killing process 627492 (nginx) with signal SIGKILL.
Mar  7 00:00:13 focal systemd[1]: nginx.service: Killing process 627493 (nginx) with signal SIGKILL.
Mar  7 00:00:13 focal systemd[1]: nginx.service: Killing process 627492 (nginx) with signal SIGKILL.
Mar  7 00:00:13 focal systemd[1]: nginx.service: Killing process 627493 (nginx) with signal SIGKILL.
Mar  7 00:00:13 focal systemd[1]: nginx.service: Failed with result 'core-dump'.
In this case revert the reload command in Nginx's logrotate configuration (/etc/logrotated.d/nginx) to the default:
postrotateinvoke-rc.d nginx rotate >/dev/null 2>&1endscript
Keepalived
Keepalived is a software to enable virtual IP addresses using the VRRP protocol (often used in routers and firewalls). An upgrade should not cause any problems, however after an upgrade from Xenial to Focal, certain health checks stopped working.
If you are using the pidof command inside a health check (vrrp_script) and pidof returns multiple PIDs in the response (which is the case for Nginx for example), Keepalived will not like this and the check will fail with an error. This can be seen in syslog where log events such as these show up:
Apr 16 09:27:27 ubuntu killall5[645003]: only one argument, a signal number, allowedAlthough no difference can be spotted between the pidof output on a Xenial and on a Focal machine, the updated Keepalived application seems to handle the output differently.
The quickest way to solve this is to replace pidof with pgrep.
Netplan
Ubuntu introduced Netplan as new network interface configuration, replacing the old but very stable ifupdown, in 17.10. The LTS version after this, 18.04 (Bionic), therefore also contains Netplan as default network configuration tool.
If you are upgrading from Xenial, the existing configuration in /etc/network/interfaces is still kept and still works. The ifupdown package is upgraded to 0.8.35. The directory /etc/netplan exists after the upgrade but should be empty.
But if you are installing a new Ubuntu 18.04 or 20.04, you will find that ifupdown is not installed and instead the network interface(s) are defined and configured in /etc/netplan/01-netcfg.yaml.
To see a comparative basic interface configuration:
root@upgraded:~# cat /etc/network/interfaces
# This file describes the network interfaces available on your system
# and how to activate them. For more information, see interfaces(5).

source /etc/network/interfaces.d/*

# The loopback network interface
auto lo
iface lo inet loopback

# The primary network interface
auto ens160
iface ens160 inet static
	address 192.168.1.13
	netmask 255.255.255.0
	network 192.168.1.0
	broadcast 192.168.1.255
	gateway 192.168.1.1
	# dns-* options are implemented by the resolvconf package, if installed
	dns-nameservers 1.1.1.1 8.8.8.8
	dns-search example.local


root@newinstall:~# cat /etc/netplan/01-netcfg.yaml
# This file describes the network interfaces available on your system
# For more information, see netplan(5).
network:
  version: 2
  renderer: networkd
  ethernets:
    ens160:
      addresses: [ 192.168.1.13/24 ]
      gateway4: 192.168.1.1
      nameservers:
          search: [ example.local ]
          addresses:
              - "1.1.1.1"
              - "8.8.8.8"
Note that Netplan can cause serious problems, especially when used in LXC containers. See LXC container not getting configured static IP addresse because of netplan. If Netplan cannot be used (complex interface configurations using virtual bridges are known to cause problems), or you simply prefer the old configuration way, remove the netplan.io package and install ifupdown package instead.
Python and its modules
When installing a new Ubuntu 20.04, Python will (by default) only be installed using Python 3. Python 2 can be installed through the python2 package.
The biggest challenge is that on a new Focal installation /usr/bin/python does not exist or does not point to either python3 or python2. In order to do this, update-alternatives (which is basically a sophisticated symbolic link) can be used to point to a specific version:
root@focal:~# update-alternatives --install /usr/bin/python python /usr/bin/python3 1When upgrading from Xenial (and you've had python installed), you will find that both python2 (2.7.18) and python3 (3.8.5) packages are installed.
However in Focal a lot of python modules have disappeared as they are not built as deb packages anymore and are therefore not found in the Ubuntu repositories. python-pywbem is a great example. The package has been around for years, but since Ubuntu 20.04, this package has disappeared along with many other Python modules.
The preferred way to install Python modules has now shifted to pip3 where modules can be installed from Python's own module repository.
root@focal:~# apt-get install python3-pip python3-setuptools
root@focal:~# pip3 install pywbem
Time synchronisation
For time synchronisation you most likely used NTP for many years, but you might be surprised that starting with Ubuntu 20.04, NTP has been replaced by yet another Systemd service called systemd-timesyncd. Although ntp package can still be installed, by default it is systemd-timesyncd which will be reponsible for keeping the system clock in sync.
This also means that a NTP configuration file /etc/ntp.conf is ignored – instead /etc/systemd/timesyncd.conf is used. A very basic timesyncd.conf file pointing to a NTP server:
root@upgraded:~# cat /etc/systemd/timesyncd.conf
[Time]
NTP=ntp1.example.com
See timesyncd.conf(5) for details.
Multipathd in virtual machine
When upgrading to Ubuntu 20.04, the upgrade will also install multipathd (package: multipath-tools) and starts this daemon by default. In a physical machine, this doesn't hurt too much. However in a virtual machine (VM), multipathd will constantly complain that it is unable to retrieve the UUID of the physical devices and will fill up the logs with entries as these:
Jun  1 10:57:23 focal multipathd[599]: sda: add missing path
Jun  1 10:57:24 focal multipathd[599]: sda: failed to get udev uid: Invalid argument
Jun  1 10:57:24 focal multipathd[599]: sda: failed to get sysfs uid: Invalid argument
Jun  1 10:57:24 focal multipathd[599]: sda: failed to get sgio uid: No such file or directory
To solve this crazy logging, either stop and disable the multipathd service (which is usually not used in a VM) or define a blacklist entry in /etc/multipath.conf.
The "accepted" solution however is to edit the VM config and allow pass-through of the virtual disks WWN's.
LVM: VG is using an old PV header
During a Kernel update, which automatically runs update-grub in the background, the following warning can be seen in the console:
/etc/kernel/postrm.d/zz-update-grub:
Sourcing file `/etc/default/grub'
Sourcing file `/etc/default/grub.d/init-select.cfg'
Generating grub configuration file ...
Found linux image: /boot/vmlinuz-5.4.0-66-generic
Found initrd image: /boot/initrd.img-5.4.0-66-generic
Found linux image: /boot/vmlinuz-4.15.0-136-generic
Found initrd image: /boot/initrd.img-4.15.0-136-generic
Found linux image: /boot/vmlinuz-4.4.0-166-generic
Found initrd image: /boot/initrd.img-4.4.0-166-generic
  WARNING: PV /dev/sda5 in VG vgsystem is using an old PV header, modify the VG to update.
done
With the OS upgrade, a newer version of LVM was installed. It's not absolutely necessary but recommended to upgrade the LVM metadata. This can be done with one simple command:
root@focal:~# vgck -v --updatemetadata vgsystem
  WARNING: PV /dev/sda5 in VG vgsystem is using an old PV header, modify the VG to update.
  WARNING: updating PV header on /dev/sda5 for VG vgsystem.
This command needs to be run against all Volume Groups (VG).
Redis can't handle RDB format version 9
When upgrading from Xenial to Focal, the Redis version will jump from 3.x via 4.x on Bionic to 5.x on Focal. If you run Redis replication, the replication itself will survive a short downtime during the upgrade. But a longer downtime requires a full resync from the master. If the master was already upgraded to Redis 5.x and the slave Redis still runs on an older version, the following error might show up in the Redis logs (/var/log/redis/redis-server.log):
19532:S 28 May 10:57:28.093 * Partial resynchronization not possible (no cached master)
19532:S 28 May 10:57:28.104 * Full resync from master: d655c0a0b91922af86386468c197ded5d81c2860:92554
19532:S 28 May 10:57:28.201 * MASTER <-> SLAVE sync: receiving 493696 bytes from master
19532:S 28 May 10:57:28.283 * MASTER <-> SLAVE sync: Flushing old data
19532:S 28 May 10:57:28.283 * MASTER <-> SLAVE sync: Loading DB in memory
19532:S 28 May 10:57:28.283 # Can't handle RDB format version 9
19532:S 28 May 10:57:28.283 # Failed trying to load the MASTER synchronization DB from disk
RDB is the full database dump saved on disk which would be transferred to and imported on the slave. With Redis 5.x the RDB format has changed to version 9 and is incompatible with older Redis versions. The slave(s) need to be upgraded in this case.
OpenSSL communication with older machines
After upgrading to Ubuntu 20.04 (Focal), many applications (including Perl or Nginx) suddenly stop working to communicate with other (older) machines using https or another TLS encrypted protocol. The program then usually shows an openssl error like this:
2021/06/18 08:42:54 [error] 3572193#3572193: *25015655 SSL_do_handshake() failed (SSL: error:14094417:SSL routines:ssl3_read_bytes:sslv3 alert illegal parameter:SSL alert number 47) while SSL handshaking to upstream, client: 31.10.153.242, server: app.example.com, request: "GET /console-selfservice HTTP/2.0", upstream: "https://10.10.23.45:7004/console-selfservice", host: "app.example.com"The reason for this is the new very strict OpenSSL SECLEVEL (security level) setting. It does not only limit the SSL and TLS protocol versions, but also the type of ciphers and key lengths used in the communication.
To fix this, the OpenSSL SECLEVEL setting needs to be adjusted on the Ubuntu 20.04 machine:
ck@focal:~$ tail -n 10 /etc/ssl/openssl.cnf

[ default_conf ]

ssl_conf = ssl_sect

[ssl_sect]

system_default = ssl_default_sect

[ssl_default_sect]
MinProtocol = TLSv1
CipherString = DEFAULT:@SECLEVEL=1
See this article for more details.
phpMyAdmin error on table view
After upgrading from Xenial to Bionic (18.04), phpMyAdmin with PHP 7.2 shows errors. This can be seen when opening a table in phpMyAdmin.
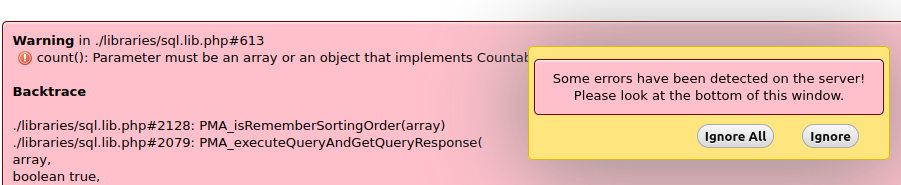
The error shows:
Warning in ./libraries/sql.lib.php#613
count(): Parameter must be an array or an object that implements Countable
The reason is that the packaged phpMyAdmin version has a problem with the also packaged PHP version 7.2. A manual phpMyAdmin update works, or yet another Ubuntu distribution upgrade to Focal (20.04).
Another workaround is to manually fix the phpMyAdmin library, which is is described in this article.
Experienced more gotchas?
Did you experience more gotchas on other applications/packages? Let us know in the comments below.


[…] […]