Once you get into coding, there's a very high chance that you will save your code in a so-called repository. This repository can be used to share the code with collaborators. Another advantage of using a code repository is to have a history (commit history) and the possibility to quickly revert back to an earlier stage of the code.
These days not only developers are working with code. With the rise of "infrastructure as a code" system administrators and devops engineers are increasingly working with code and repositories, too.
For beginners working with the git command can be overwhelming, especially if you haven't worked with code versioning systems (svn, mercurial and others) before.
This article makes a (very basic) but nevertheless helpful introduction of git commands.
Installation of git
Obviously to start using git, the git command needs to be installed. On all major Linux distributions this can be easily installed from the official package repositories.
On Debian and Ubuntu based distributions:
$ sudo apt install gitOn RedHat and CentOS distributions:
$ sudo yum install gitOn SUSE Linux distributions:
$ sudo zypper in gitOn Windows OS, git can be installed using the "Git for Windows" installation packages.
Git configuration
Before creating your first commit, git will ask you for a few things. The minimal configuration you should do is set your e-mail address and user name, or git might error on you with "Author identify unknown" or a similar message.
gituser@bullseye:~$ git config --global user.email "[email protected]"
gituser@bullseye:~$ git config --global user.name "Geekers Digest"
Of course you need to replace the values with your information.
Cloning a repository
Before starting to work with code, you first need to "download" the repository to your system. A public repository can easily be cloned. For example looking at the check_smart repository, the whole repository can be cloned:
gituser@bullseye:~$ git clone https://github.com/Napsty/check_smart.git
Cloning into 'check_smart'…
remote: Enumerating objects: 413, done.
remote: Counting objects: 100% (102/102), done.
remote: Compressing objects: 100% (56/56), done.
remote: Total 413 (delta 56), reused 75 (delta 40), pack-reused 311
Receiving objects: 100% (413/413), 118.52 KiB | 4.94 MiB/s, done.
Resolving deltas: 100% (160/160), done.
In your file system you will now find a new directory (usually the same name of the repository):
gituser@bullseye:~$ ls -la
total 24
drwxr-xr-x 3 gituser gituser 4096 Nov 6 14:18 .
drwxr-xr-x 5 root root 4096 Nov 6 14:15 ..
-rw-r--r-- 1 gituser gituser 220 Mar 27 2022 .bash_logout
-rw-r--r-- 1 gituser gituser 3526 Mar 27 2022 .bashrc
drwxr-xr-x 4 gituser gituser 4096 Nov 6 14:18 check_smart
-rw-r--r-- 1 gituser gituser 807 Mar 27 2022 .profile
Change into this directory (the repository) to start working with the code.
gituser@bullseye:~$ cd check_smart/Updating (pulling) the code
At the moment of the git clone command, the repository was downloaded in its latest version. But it could be that some code was already updated (by someone else) in the meantime. Before start working with code, it's generally a good idea to first download all recent changes. This can be done using the git pull command inside the repository.
gituser@bullseye:~/check_smart$ git pull
Already up to date.
In this situation no code change happened since the repository was cloned. If there were changes, the output looks slightly different, showing which local files have been modified.
Changing code, commit and push
Working with the code and then upload the changes back to the (remote) basically means the following steps:
Change code, with an editor (graphical IDE or command line such as nano or vim), save the changes.
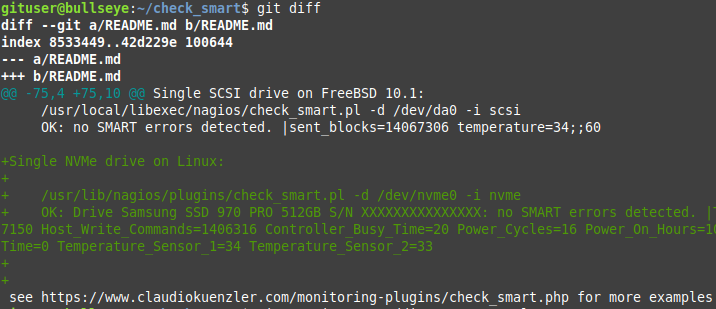
gituser@bullseye:~/check_smart$ vi README.mdOnce you have saved the changes, you can see your changes using git diff:
gituser@bullseye:~/check_smart$ git diff
diff --git a/README.md b/README.md
index 8533449..42d229e 100644
--- a/README.md
+++ b/README.md
@@ -75,4 +75,10 @@ Single SCSI drive on FreeBSD 10.1:
     /usr/local/libexec/nagios/check_smart.pl -d /dev/da0 -i scsi
     OK: no SMART errors detected. |sent_blocks=14067306 temperature=34;;60

+Single NVMe drive on Linux:
+
+    /usr/lib/nagios/plugins/check_smart.pl -d /dev/nvme0 -i nvme
+    OK: Drive Samsung SSD 970 PRO 512GB S/N XXXXXXXXXXXXXXX: no SMART errors detected. |Temperature=34 Available_Spare=100 Available_Spare_Threshold=10 Percentage_Used=0 Data_Units_Read=2854 Data_Units_Written=107590 Host_Read_Commands=67150 Host_Write_Commands=1406316 Controller_Busy_Time=20 Power_Cycles=16 Power_On_Hours=105 Unsafe_Shutdowns=6 Media_and_Data_Integrity_Errors=0 Error_Information_Log_Entries=0 Warning__Comp._Temperature_Time=0 Critical_Comp._Temperature_Time=0 Temperature_Sensor_1=34 Temperature_Sensor_2=33
+
+
 see https://www.claudiokuenzler.com/monitoring-plugins/check_smart.php for more examples
Depending on your terminal settings, the code changes are either shown in green (added content) or in red (removed content):
The next step is to create a commit (change history/change log). You should always add a comment to describe your code change. This can be done in a single step using the -m (message) parameter:
gituser@bullseye:~/check_smart$ git commit -am "Adding NVMe example"
[master 4192cd7] Adding NVMe example
 1 file changed, 6 insertions(+)
The output also shows you important information: On which branch this commit happened (master branch), the commit's unique identification (4192cd7) and a summary of how much you've changed (1 file, 6 added lines).
After the commit, your code changes are applied, but only to the local copy of the repository. You still need to push the changes to the remote repository server (also called origin). A git push most likely requires an authentication first.
gituser@bullseye:~/check_smart$ git push
Username for 'https://github.com': Napsty
Password for 'https://[email protected]':
Enumerating objects: 5, done.
Counting objects: 100% (5/5), done.
Delta compression using up to 16 threads
Compressing objects: 100% (3/3), done.
Writing objects: 100% (3/3), 657 bytes | 657.00 KiB/s, done.
Total 3 (delta 2), reused 0 (delta 0), pack-reused 0
remote: Resolving deltas: 100% (2/2), completed with 2 local objects.
To https://github.com/Napsty/check_smart.git
8ea721d..4192cd7 master -> master
Note: To avoid entering your git credentials on every push, take a look at article GitHub Deprecation Notice: Switching from password to token authentication.
Congratulations, you have pushed your changed code to the remote repository! However this only works if you are the owner or you have write permissions on the remote repository. If you want to change code from a repository which is not managed by you, you should create a pull request.
Creating a Pull Request
A Pull Request is basically saying "I have a suggestion to change the code in your repository". The owner of that repository (maintainer) can have a look at the pull request, which shows the information from the commit, and can either deny or approve it. If the pull request is approved, the code changes are "pulled in" from a foreign (your) repository.
The following summary was sent to me in 2013 when working with git was quite new to me (and confusing at the beginning). The following pull request step by step guide still applies today and is a great helper/reminder how a pull request works:
1) Fork the repository into your own (using your browser on GitHub, simply click the "Fork" button)

2) Clone your repository to your workstation (using git clone but using your own forked repository URL)
3) Create a branch specifically for the fix (git checkout -b my-branch)
4) Make the changes to the code/content
5) Commit the changes (git commit -am "my changes")
6) Push the branch back to GitHub (git push origin my-branch)
The output should contain a URL where you can create a pull request, for example:
Writing objects: 100% (3/3), 304 bytes | 304.00 KiB/s, done.
Total 3 (delta 2), reused 0 (delta 0), pack-reused 0
remote: Resolving deltas: 100% (2/2), completed with 2 local objects.
remote:
remote: Create a pull request for 'my-branch' on GitHub by visiting:
remote:      https://github.com/Napsty/check_smart/pull/new/my-branch
remote:
To https://github.com/Napsty/check_smart.git
 * [new branch]      my-branch -> my-branch
At that point, you have a new branch with just the changes. Go to your repository on GitHub in your browser (use the link from the output above), and create the pull request, making sure to point to your own branch.

Kudos to Justin Ellison for the great advise. It's been almost 10 years but it is still much appreciated!


[…] A while ago we published an article how to get started with the git command. […]